Mastering A-Painter
It has been almost four months since we released A-Painter. We've received lots of compliments, help and feedback from users and developers. Thanks for your support!
Now that you're familiar with the basics, let's explore some advanced features that you might not know and make part of my A-Painter creative workflow.
Reference Images and 3D Models
You can use images and 3D models as references for your paintings. Just drag and drop images or OBJ files directly on A-Painter. Please note that neither reference images or models are saved with the painting!. They are just that: references for painting.
The images or models are randomly placed in the space, you cannot modify their position (yet). If by any chance they overlap or you don't like the layout you can refresh the page and load the files again.
3D models will be loaded without any transformation. Make sure to prepare them beforehand with the scale, position and rotation you prefer. 3D models will have a dark grey plastic as predefined material so they don't interfere with your painting.
Remember: 1 unit = 1 real meter in VR. So if you create a default UV Sphere in Blender that has radius 1, export it to OBJ and bring it to A-Painter, you will have in the scene a sphere with a radius of 1 meter (2 meters diameter).
Keyboard Shortcuts
| Backspace | Undo (same as the UNDO button in the controller menu, multiple levels of undo[^1]) |
| c | Clear the painting (same as the CLEAR button in the controller menu) |
| o | Show/hide reference objects and images |
| u | Upload your painting to Uploadcare[^2] (same action as the SAVE button). You will get a share link in your browser. If you want to download the file, trim the Uploadcare part out of the whole url and you will asked to save it. Just name it with an .apa extension. |
| v | Save your painting locally in an .apa file[^3] (think of the v as a down arrow). |
| j | Save your painting locally in a .json file. |
| n | Select next brush |
2 We are using http://uploadcare.com/ file hosting services for now, but this may change depending on A-Painter evolution and usage.
3 APA is a binary format designed for A-Painter much more compact than JSON. For more information, check the Readme (https://github.com/aframevr/a-painter#file-format).
URL Parameters
You can use a number of parameters when loading or sharing an A-Painter url:
| Parameter | Type | Description |
| url | URL | Load a painting in APA format |
| urljson | URL | Load a painting in JSON format |
| sky | image URL | Set a different sky texture (leave empty to remove sky) |
| floor | image URL | Set a different floor texture (leave empty to remove floor) |
| bgcolor | Hex color without the # (for example, bgcolor=FFF) | Set a different background color |
Hacking Your Paintings
You can save paintings in JSON format, which can be loaded by simply dragging and dropping them inside A-Painter. Note that the previous painting is not cleared! Use the CLEAR button or c key to do it before dragging the new painting. But hey, it can be interesting to mix paintings together..
Warning: large paintings can take some seconds to load, be patient!
Would you like to play and hack with A-Painter paintings data? The format is quite simple. What you get is an array of brush presets and an array of strokes, each one done with one of those brush presets:
{
   version: "apainter1",
   brushes: string [],
   strokes: {
      brush: {
         index: int,
         color: {r: float, g: float, b: float},
         size: float
      },
      points: {
         position: {x: float, y: float, z: float},
         orientation: {x: float, y: float, z: float, w: float},
         pointerPosition: {x: float, y: float, z: float},
         pressure: float,
         timestamp : int
      }[]
   }[]
}
For example, a very simple painting is something like this: http://www.jsoneditoronline.org/?id=b704e3797675b4e8e3d4d22f800ccf3a
We have access to each point's position, orientation, pressure, and time of creation! We can reinterpret this data the way we want. For example, from the data of the painting above, we can make some UFOs fly (z for scale):
See the Pen apainter-apa-ufo by Diego F Goberna (@feiss) on CodePen.
We can draw patterns:
See the Pen apainter-tutorial-random-lines by Diego F Goberna (@feiss) on CodePen.
See the Pen apainter-tutorial-connecting-lines by Diego F Goberna (@feiss) on CodePen.
...endless possibilities!!
See the Pen apainter-tutorial-piano by Diego F Goberna (@feiss) on CodePen.
We are showing basic 2D examples here to simplify, I'm sure you got the point! With our HTC Vive or Oculus Rift Touch controllers we have a very reliable and performant Motion Capture System in our hands, and A-Painter provides a very easy way to create and retrieve motion data with it :)
Custom Brushes
Since A-Painter is open source, you can customize, change and improve any aspect of it, and even send us a pull request to add that change to the official version.
Making new custom brushes can be done in two ways: by adding new presets to the line and stamp brushes, or by making complete new brushes using the brush API.
Please note that for customizing brushes, you need your own local copy of A-Painter. Grab it from gitHub and follow these instructions.
Adding new Line and Stamp presets
Apart from some FX brushes in the third page of brushes of the UI, all A-Painter brushes are grouped in two main categories: Line and Stamp, defined in src/brushes/line.js and src/brushes/stamp.js.
The main difference is that line brushes stretch a texture along the stroke, and stamp brushes drop a sample of the texture in each point of the stroke.
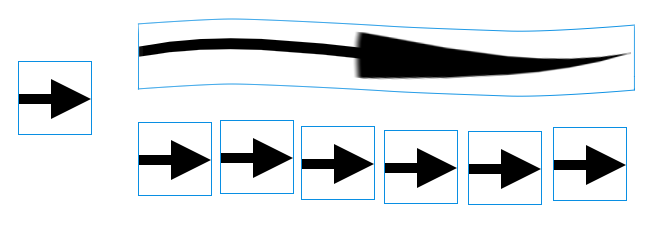
(Left: the texture used. Top: sample stroke done using a line brush using that texture. Bottom: same stroke done with a stamp brush)
So two implementations of the brush API (line.js and stamp.js) are enough to provide about 30 different brushes, just by using different presets and textures. At the end of each of those files you will find the presets. So just by adding (or modifying) presets to those lists you can add your custom brushes based on these two main categories.
New line brush preset
Let's say we want a brush that starts and ends thick but it is thin in the middle of the stroke. Prepare a texture like this in your favorite painting application (the gray part is the transparent part of the image) or just download this one:
All A-Painter textures are located in the
/brushesfolder, you could use one of those as a starting point
And you need to make another image for the thumbnail. Something like this:
Add these two images to the /brushes folder, and add the new preset at the beginning of the preset list (so it is listed in the first position in the UI):
var lines = [
    {
      name: 'mybrush',
      materialOptions: {
        type: 'textured',
        textureSrc: 'brushes/mybrush.png'
     },
      thumbnail: 'brushes/thumb_mybrush.png'
    },
//rest of presets..
Line options are:
nameAn unique name for your brush.materialOptions.typeOne of 'flat' (constant color) or 'shaded' (color changes with light)materialOptions.textureSrcThe path to the brush texturethumbnailThe path to the thumbnail image
Save the line.js file, start the server of your local version of A-Painter (npm start), go to localhost:8080 and voila!
New Stamp Brush Preset
Let's create a new Stamp brush now. What about flowers?
Stamp options are:
name(string)An unique name for your brushmaterialOptionstype(string)Either 'flat' (constant color) or 'shaded' (color changes with light)textureSrc(string)Path to the texture sourceautoRotate(boolean - optional)Each sample of the stamp is rotated 0.1 radian respective to the previousangleJitter(float - optional)Each sample is randomly rotated +-angleJitter radianssubTextures(int - optional)If you want more variation in your stamp brush you can add additional textures to it, just by putting them together one after another in one row, and specifying how many of them are there using this parameter.
thumbnail(string)Path to the thubmnail imagespacing(float)This parameter is quite important, to control the minimum separation (in meters) you want among the stamps.
Our flower stamp preset could have these parameters:
{
  name: 'flowers',
  materialOptions: {
    type: 'shaded',
    textureSrc: 'brushes/flower.png',
    angleJitter: Math.PI / 2,
 },
  thumbnail: 'brushes/thumb_flower.png',
  spacing: 0.15
}
By adding the parameter subTextures:3 we could use this texture to have more variation:
Using the Brush API to Create a New Brush
Another way of making brushes is by programming them from scratch using the Brush API. Next week I will post a detailed tutorial about it. Stay tuned!
Small Tips
-
The more strokes you do, the less performant the app will be. One long stroke is more lightweight performance wise than many short strokes, even if their total length is much shorter than the long one. (There is a lot of room for optimization in A-Painter, and this is a pending enhancement we have).
-
The colors you see in your VR headset may look quite different in your monitor. Consider this when taking screenshots, you may want to tweak them before sharing.
Join the A-Painter Family!
A-Painter hasn't been around long, but has a lot of potential. Mozilla VR is committed to bringing new VR technologies, experiments and experiences, and we need your help! If you have ideas or improvements, join us on GitHub. Your contributions will help make A-Painter better for everyone!