Creating a new A-Painter brush using the Brush API
In this tutorial we will take the minimum steps required to create a very simple brush for A-Painter, a VR painting experience made by Mozilla VR built with A-Frame. For example, a brush to draw simple lines. We will going to call it simpleline.
Please notice that for making new brushes using A-Painter's Brush API you need to have some Javascript programming basics and also be a bit familiar with Three.js.
This will be an in-depth explanation of how to make a brush. For a quick start, take a look to this nice introduction by Michael Feldstein
Setup
Download A-Painter Source Code
First, you need to grab your own copy of A-Painter and save to your computer, so you can change its code. If you have Git installed, you can easily do this by:
cd your/folder
git clone http://github.com/aframevr/a-painter.git
cd a-painter
If you don't have Git, you can go to http://github.com/aframevr/a-painter, click on the green button "Clone or download", download the zip and unzip it wherever you want.
Run and Test
For running your local copy of A-Painter, you need npm installed. Just enter the directory where A-Painter is and run npm start. Then, open http://localhost:8080 with a VR compatible browser.
Creating an 'Empty' Brush
If we read the A-Painter readme, it says you need to implement this very simple interface:
BrushInterface.prototype = {
  init: function (),
  addPoint: function (position, orientation, pointerPosition, pressure, timestamp) {},
  tick: function (timeOffset, delta) {}
};
The code sample above contains a function for initialization, another for adding new 'points' to the stroke, and another for animating the brush if that would be the case.
So, let's start by creating the skeleton of the brush:
First, copy this image to a-painter/brushes/thumb_simpleline.png. It will be the thumbnail image of our brush, so we can find it in the menu later.
Then, create a file in src/brushes/ called simpleline.js, paste this code and save it:
AFRAME.registerBrush(
  'simpleline',
  {
    init: function(color, width) {},
    addPoint: function(position, orientation, pointerPosition, pressure, timestamp) { return true; },
    tick: function(time, delta) {}
  },
  {
    thumbnail: 'brushes/thumb_simpleline.png',
    maxPoints: 1000,
    spacing: 0
  }
);
This is the bare minimum. It does not paint anything, but A-Painter will accept it as a new brush. But before that, we need to add the simpleline.js to the list of files that need to be loaded when starting A-Painter. We do that by adding this line to src/index.js:
require('./brushes/simpleline.js');
Now if you run your local A-Painter and test it with your HTC Vive or Oculus with controllers, you will find your new brush at the end of the list of brushes:
For testing back and forth it is quite convenient to have the brush already selected by default. To do this, go to
src/components/brush.js and in the schema definition at the top of the file change brush: {default: 'line'} by brush : {default: 'simpleline'}.
Connecting the dots
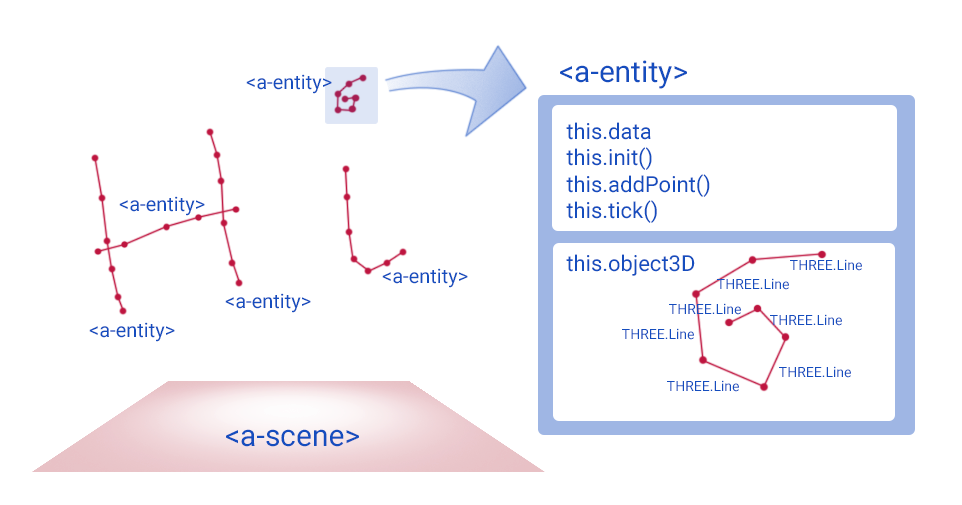
So, let's make our brush actually paint something. Every time you push the trigger to start a new stroke, A-Painter adds a new entity (an A-Frame <a-entity>) in the scene that will hold the geometry of the stroke. Then, A-Painter starts calling your addPoint() function each time the controller is moved more than spacing meters, so you can add stuff to your brush, grow the stroke or whatever your brush does. Normally, you will want to add or modify the 3D geometry of the brush, which can be accessed via this.object3D. In our case, for each new point we will draw a line from it to the previous one. The basic way of doing this is by creating new THREE.Line that will be added to the object3D.
Go to our simpleline.js file and change the addPoint() function like this:
addPoint: function(position, orientation, pointerPosition, pressure, timestamp) {

  // if it is the first point, there's no line to paint
  if (this.data.prevPointerPosition) {
    var lineGeometry = new THREE.Geometry();

    // line from current position to the previous one
    lineGeometry.vertices.push(pointerPosition, this.data.prevPointerPosition);

    // create a material for the line with the current color selected
    var lineMaterial = new THREE.LineBasicMaterial({color: this.data.color});

    // create the line mesh
    var line = new THREE.Line(lineGeometry, lineMaterial);

    // add it to the stroke entity
    this.object3D.add(line);
  }

  // point added!
  return true;
},
The parameters passed to addPoint() represent the data of the new point, like its position, orientation, pressure of the trigger used (from 0 to 1) and the time it was made (in microseconds from the beginning of A-Painter page load). The difference between position and pointerPosition is that position refers to the center of the controller (more less above the trigger) and pointerPosition refers to the tip of the controller, from where the 'paint' is supposed to appear.
In your brush you may want to discard the new point that is being added. In that case, simply return false.
In our new addPoint(), we first check if this.data.prevPoint exists or not. If it does not it means that this is the first point, so we skip adding a new line (but we keep returning true so the point is added to the list of points of the stroke, and used in the next addPoint() as the first vertex of the first line).
Go try it!
I know, I know, the line is too thin! LineBasicMaterial has a linewidth parameter indeed, but as the documentation reads:
Due to limitations in the ANGLE layer, with the WebGL renderer on Windows platforms
linewidthwill always be 1 regardless of the set value.
(As an exercise, you could try to use linewidth and load the scene in macOS or linux)
Caching
Since addPoint() is usually called hundreds of times for each stroke you make, you want it to be as fast as possible and avoid creating unnecessary stuff. For this reason, it is a good decision to cache and reuse all you can. In our example, the material is the same for every line added to the stroke, so let's cache it. The init() function is perfect for this purpose for is it called just one time, at the beginning of the stroke:
init: function () {
  this.material = new THREE.LineBasicMaterial({color: this.data.color});
}
and then change our addPoint():
addPoint: function(position, orientation, pointerPosition, pressure, timestamp) {
  if (this.data.prevPointerPosition) {
    var lineGeometry = new THREE.Geometry();
    lineGeometry.vertices.push(pointerPosition, this.data.prevPointerPosition);

    // removed the line that created the material

    // reusing the material
    var line = new THREE.Line(lineGeometry, this.material);
    this.object3D.add(line);
  }
  return true;
},
in all our brush functions we have the object this.data available with many useful properties:
- this.data.points: list of points added to the stroke
- this.data.numPoints: length of this.data.points
- this.data.size: size of the stroke when it was created. Multiply it by
pressureinaddPoint()to get the current -pressure sensitive- size of the stroke - this.data.prevPosition: position of the controller in the latest stroke
- this.data.prevPointerPosition: position of the tip in the latest stroke
- this.data.maxPoints: maximum number of points that we previously defined this brush can hold on each stroke
- this.data.color: the color that was selected when the stroke started
IMPORTANT NOTE: this brush is very unoptimized, creating a single line for every 2 vertices is a very bad decision, and as soon as you paint some strokes you probably perceive a drop in the frame rate. I just wanted to keep this tutorial as simple as possible.
(If you wonder, the proper way of doing dynamic lines in threejs is using BufferGeometries. I've rewritten this brush using BufferGeometries and uploaded to the tutorial GitHub).
Alive Brush
By using the function tick() we can animate the strokes of our brush in any way we want. This function is called continuously on every frame and receives two parameters: time and delta. The first is the number of microseconds passed since the beginning of A-Painter, and the second is the difference of microseconds between this call and the last tick. They are useful for making the animation time dependant and running always at the same speed regarding of the frame rate.
Let's just add a simple little jitter to the lines:
tick: function (time, delta) {

  // get a random offset
  var rnd1 = new THREE.Vector3(Math.random() * 0.001 - 0.0005, Math.random() * 0.001 - 0.0005, Math.random() * 0.001 - 0.0005);

  // iterate all lines
  for (var i = 0; i < this.object3D.children.length; i++) {

    // get a second offset
    var rnd2 = new THREE.Vector3(Math.random() * 0.001 - 0.0005, Math.random() * 0.001 - 0.0005, Math.random() * 0.001 - 0.0005);

    // apply offsets to both vertices of each line
    this.object3D.children[i].geometry.vertices[0].add(rnd2);
    this.object3D.children[i].geometry.vertices[1].add(rnd1);

    // set first offset to the second, so lines don't break
    rnd1 = rnd2;

    // tell threejs to update vertex positions
    this.object3D.children[i].geometry.verticesNeedUpdate = true;
  }
}
For this to work, the vertices objects must be unique references. For doing this, in our function addPoint() change the line:
lineGeometry.vertices.push(pointerPosition, this.data.prevPointerPosition);
for
lineGeometry.vertices.push(pointerPosition.clone(), this.data.prevPointerPosition.clone());
Try this again, and check it out: lightning bolts! :D/
In the brush version using BufferGeometry, the
tick()function is much more simple, take a peek.
Now, Your Turn!
I hope you find this tutorial clear and interesting, and that you are eager to create your own custom brushes. If you make something cool, please share it with us! You can contribute and add new brushes to the official A-Painter by sending a pull request to the A-Painter repository.
You can find the source code of this tutorial on GitHub.