Jingle Smash: Geometry and Textures
 -
-
This is part 3 of my series on how I built Jingle Smash, a block smashing WebVR game
I’m not a designer or artist. In previous demos and games I’ve used GLTFs, which are existing 3D models created by someone else that I downloaded into my game. However, for Jingle Smash I decided to use procedural generation, meaning I combined primitives in interesting ways using code. I also generated all of the textures with code. I don’t know how to draw pretty textures by hand in a painting tool, but 20 years of 2D coding means I can code up a texture pretty easily.
Jingle Smash has three sets of graphics: the blocks, the balls, and the background imagery. Each set uses its own graphics technique.
Block Textures
The blocks all use the same texture placed on every side, depending on the block type. For blocks that you can knock over I called these ‘presents’ and gave them red ribbon stripes over a white background. I drew this into an HTML Canvas with standard 2D canvas code, then turned it into a texture using the THREE.CanvasTexture class.
const canvas = document.createElement('canvas')
canvas.width = 128
canvas.height = 128
const c = canvas.getContext('2d')

//white background
c.fillStyle = 'white'
c.fillRect(0,0,canvas.width, canvas.height)

//lower left for the sides
c.save()
c.translate(0,canvas.height/2)
c.fillStyle = 'red'
c.fillRect(canvas.width/8*1.5, 0, canvas.width/8, canvas.height/2)
c.restore()

//upper left for the bottom and top
c.save()
c.translate(0,0)
c.fillStyle = 'red'
c.fillRect(canvas.width/8*1.5, 0, canvas.width/8, canvas.height/2)
c.fillStyle = 'red'
c.fillRect(0,canvas.height/8*1.5, canvas.width/2, canvas.height/8)
c.restore()

c.fillStyle = 'black'

const tex = new THREE.CanvasTexture(canvas)
this.textures.present1 = tex

this.materials[BLOCK_TYPES.BLOCK] = new THREE.MeshStandardMaterial({
    color: 'white',
    metalness: 0.0,
    roughness: 1.0,
    map:this.textures.present1,
})
Once the texture is made I can create a ThreeJS material with it. I tried to use PBR (physically based rendering) materials in this project. Since the presents are supposed to be made of paper I used a metalness of 0.0 and roughness of 1.0. All textures and materials are saved in global variables for reuse.
Here is the finished texture. The lower left part is used for the sides and the upper left for the top and bottom.

The other two box textures are similar, a square and cross for the crystal boxes and simple random noise for the walls.
Skinning the Box
By default a BoxGeometry will put the same texture on all six sides of the box. However, we want to use different portions of the texture above for different sides. This is controlled with the UV values of each face. Fortunately ThreeJS has a face abstraction to make this easy. You can loop over the faces and manipulate the UVs however you wish. I scaled and moved them around to capture just the parts of the texture I wanted.
geo.faceVertexUvs[0].forEach((f,i)=>{
    if(i === 4 || i===5 || i===6 || i===7 ) {
        f.forEach(uv=>{
            uv.x *= 0.5 //scale down
            uv.y *= 0.5 //scale down
            uv.y += 0.5 //move from lower left quadrant to upper left quadrant
        })
    } else {
        //rest of the sides. scale it in
        f.forEach(uv=>{
            uv.x *= 0.5 // scale down
            uv.y *= 0.5 // scale down
        })
    }
})
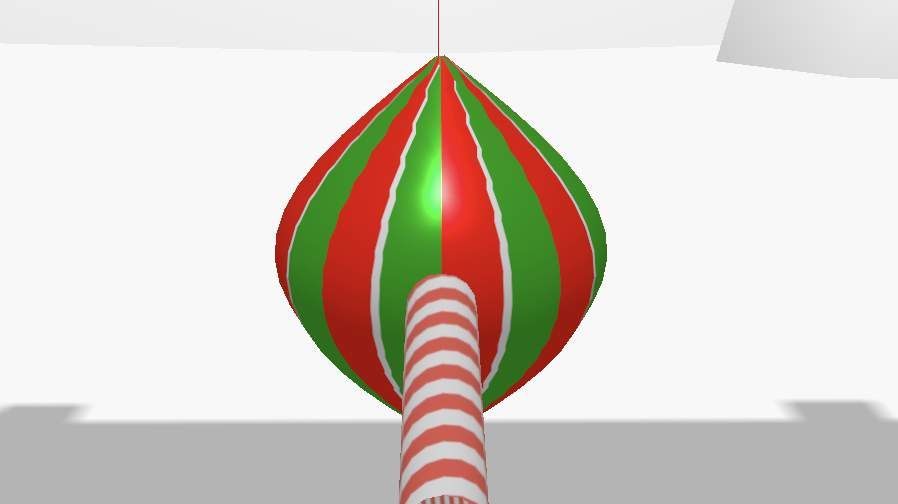
Striped Ornaments
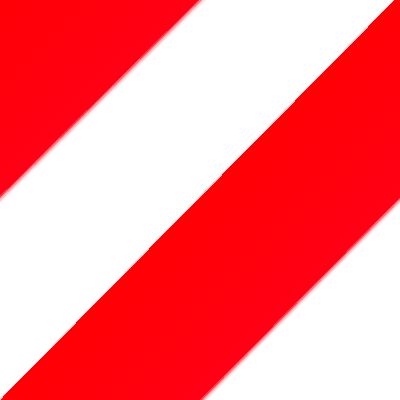
There are two different balls you can shoot. A spherical ornament with a stem and an oblong textured one. For the textures I just generated stripes with canvas.
{
    const canvas = document.createElement('canvas')
    canvas.width = 64
    canvas.height = 16
    const c = canvas.getContext('2d')

    c.fillStyle = 'black'
    c.fillRect(0, 0, canvas.width, canvas.height)
    c.fillStyle = 'red'
    c.fillRect(0, 0, 30, canvas.height)
    c.fillStyle = 'white'
    c.fillRect(30, 0, 4, canvas.height)
    c.fillStyle = 'green'
    c.fillRect(34, 0, 30, canvas.height)

    this.textures.ornament1 = new THREE.CanvasTexture(canvas)
    this.textures.ornament1.wrapS = THREE.RepeatWrapping
	  this.textures.ornament1.repeat.set(8, 1)
}

{
    const canvas = document.createElement('canvas')
    canvas.width = 128
    canvas.height = 128
    const c = canvas.getContext('2d')
    c.fillStyle = 'black'
    c.fillRect(0,0,canvas.width, canvas.height)

    c.fillStyle = 'red'
    c.fillRect(0, 0, canvas.width, canvas.height/2)
    c.fillStyle = 'white'
    c.fillRect(0, canvas.height/2, canvas.width, canvas.height/2)

    const tex = new THREE.CanvasTexture(canvas)
    tex.wrapS = THREE.RepeatWrapping
    tex.wrapT = THREE.RepeatWrapping
    tex.repeat.set(6,6)
    this.textures.ornament2 = tex
}
The code above produces these textures:


What makes the textures interesting is repeating them on the ornaments. ThreeJS makes this really easy by using the wrap and repeat values, as shown in the code above.
One of the ornaments is meant to have an oblong double turnip shape, so I used a LatheGeometry. With a lathe you define a curve and ThreeJS will rotate it to produce a 3D mesh. I created the curve with the equations x = Math.sin(I*0.195) * radius and y = i * radius /7.
let points = [];
for (let I = 0; I <= 16; I++) {
    points.push(new THREE.Vector2(Math.sin(I * 0.195) * rad, I * rad / 7));
}
var geometry = new THREE.LatheBufferGeometry(points);
geometry.center()
return new THREE.Mesh(geometry, new THREE.MeshStandardMaterial({
    color: ‘white’,
    metalness: 0.3,
    roughness: 0.3,
    map: this.textures.ornament1,
}))
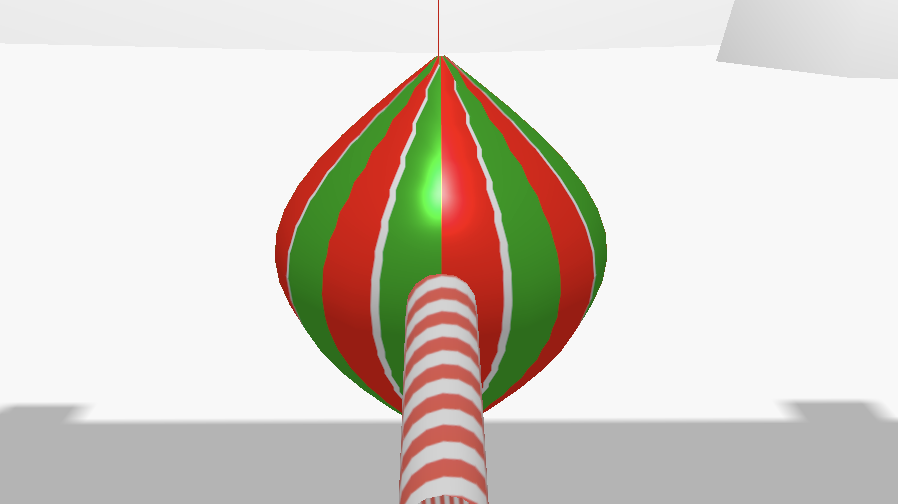
For the other ornament I wanted a round ball with a stem on the end like a real Christmas tree ornament. To build this I combined a sphere and cylinder.
const geo = new THREE.Geometry()
geo.merge(new THREE.SphereGeometry(rad,32))
const stem = new THREE.CylinderGeometry(rad/4,rad/4,0.5,8)
stem.translate(0,rad/4,0)
geo.merge(stem)
return new THREE.Mesh(geo, new THREE.MeshStandardMaterial({
    color: ‘white’,
    metalness: 0.3,
    roughness: 0.3,
    map: this.textures.ornament2,
}))
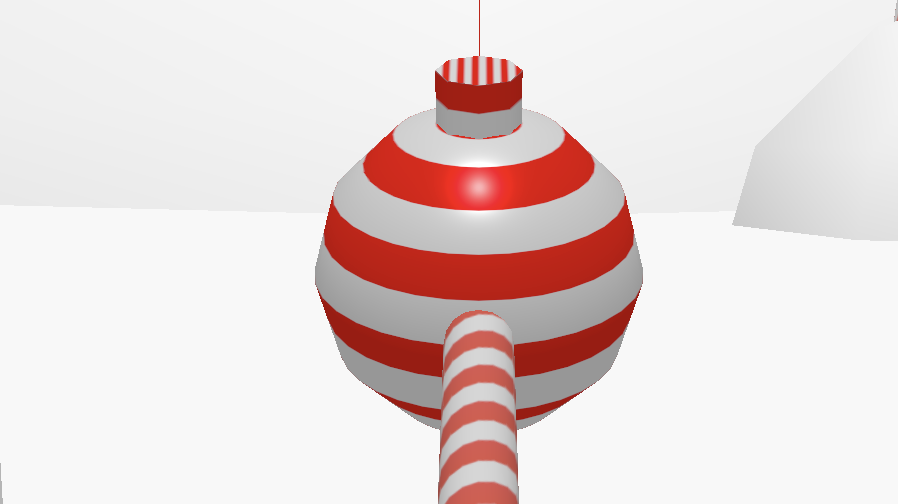
Since I wanted the ornaments to appear shiny and plasticy, but a shiny as a chrome sphere, I used metalness and roughness values of 0.3 and 0.3.
Note that I had to center the oblong ornament with geometry.center(). Even though the ornaments have different shapes I represented them both as spheres on the physics side. If you roll the oblong one on the ground it may look strange seeing it perfectly like a ball, but it was good enough for this game. Game development is all about cutting the right corners.
Building a Background
It might not look like it if you are in a 3 degree of freedom (3dof) headset like the Oculus Go, but the background is not a static painting. The clouds in the sky are an image but everything else was created with real geometry.
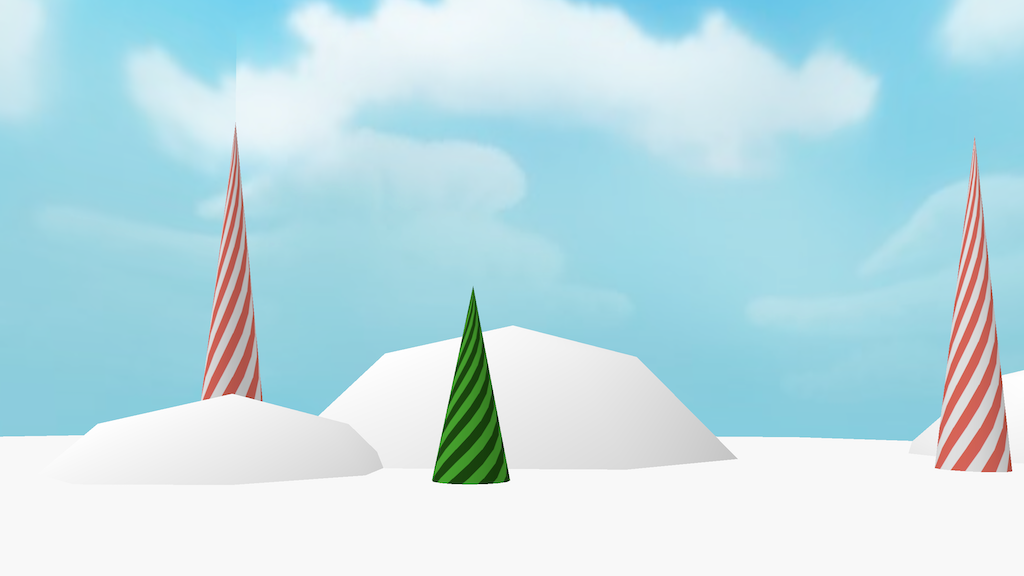
The snow covered hills are actually full spheres placed mostly below the ground plane. The trees and candy are all simple cones. The underlying stripe texture I drew in Acorn, a desktop drawing app. Other than the clouds it is the only real texture I used in the game. I probably could have done the stripe in code as well but I was running out of time. In fact both the trees and candy mountains use the exact same texture, just with a different base color.
        const tex = game.texture_loader.load(‘./textures/candycane.png’)
        tex.wrapS = THREE.RepeatWrapping
        tex.wrapT = THREE.RepeatWrapping
        tex.repeat.set(8,8)

        const background = new THREE.Group()

        const candyCones = new THREE.Geometry()
        candyCones.merge(new THREE.ConeGeometry(1,10,16,8).translate(-22,5,0))
        candyCones.merge(new THREE.ConeGeometry(1,10,16,8).translate(22,5,0))
        candyCones.merge(new THREE.ConeGeometry(1,10,16,8).translate(7,5,-30))
        candyCones.merge(new THREE.ConeGeometry(1,10,16,8).translate(-13,5,-20))
        background.add(new THREE.Mesh(candyCones,new THREE.MeshLambertMaterial({ color:’white’, map:tex,})))

        const greenCones = new THREE.Geometry()
        greenCones.merge(new THREE.ConeGeometry(1,5,16,8).translate(-15,2,-5))
        greenCones.merge(new THREE.ConeGeometry(1,5,16,8).translate(-8,2,-28))
        greenCones.merge(new THREE.ConeGeometry(1,5,16,8).translate(-8.5,0,-25))
        greenCones.merge(new THREE.ConeGeometry(1,5,16,8).translate(15,2,-5))
        greenCones.merge(new THREE.ConeGeometry(1,5,16,8).translate(14,0,-3))

        background.add(new THREE.Mesh(greenCones,new THREE.MeshLambertMaterial({color:’green’, map:tex,})))
All of them were positioned by hand in code. To make this work I had to constantly adjust code then reload the scene in VR. At first I would just preview in my desktop browser, but to really feel how the scene looks you have to view it in a real 3D headset. This is one of the magical parts about VR development with the web. Iteration is so fast.
Note that even though I have many different cones I merged them all into just two geometries so they can be drawn together. It’s far better to have two draw calls instead of 10 for a static background.
Next Steps
I'm pretty happy with how the textures turned out. By sticking to just a few core colors I was able to create with both consistency and variety. Furthermore, I was able to do it without any 3D modeling. Just some simple canvas code and a lot of iteration.
Next time I'll dive into the in-game level editor.